Setup tutorial
Everything you need in order to run this project
Table of content
This page contains all the required steps that you must follow in order to have a fully working development environment. Each tutorial can be found its in own section with more details on how to use particular tools.
Warning
It is important to follow this setup guide in the correct order of sections!
(New) Docker setup
A new setup alternative is the Docker setup. This setup is a lot more simple as it will install most of the requirements for you.
Note
This section will describe how to install and run ADE Scheduler under Docker on your system.
I. Install Docker
First, you must have Docker installed on your system. We recommend to install it from the official website: https://docs.docker.com/desktop/#download-and-install
II. Pull Docker image
Pull the Docker image:
$ docker pull gilponcelet/ade-scheduler
III. Build and run the ADE Scheduler server
Run the following in <repo>:
$ docker build -f Dockerfile -t ade-scheduler .
$ docker run --name ade-scheduler -it -p 5000:5000 -v <Path to ADE-Scheduler folder>:/ADE-Scheduler ade-scheduler
$ docker start -i ade-scheduler       # To run the app
$ docker exec -it ade-scheduler bash  # To e.g. run `flask shell`
Warning
This tutorial is still under development! Any problem you might encounter is important for us, so please contact use whenever you need help :-)
1. Redis server
Note
A Redis server is used as a cache memory storage and will, among others, act as a buffer between the ADE API and ADE Scheduler in order to enhance performance and to reduce delay between repetitive requests.
I. Install Redis
The installation process is pretty simple and we recommend you to follow the official guide: https://redis.io/topics/quickstart
II. Check that it works
Before running into more troubles, make sure that Redis is correctly installed and that you can manually start a server from command line. Something like this should work:
$ redis-server
do not kill this terminal
$ redis-cli ping
you should receive `pong`
$ redis-cli shutdown
this kills the redis server
2. ADE Scheduler
Note
This section will describe every tools that is brought with the ADE Scheduler repository. While many tools can be installed separately, the Github of this project contains many tools and things to setup that can be done in a few clicks.
New to Github ?
If you are new to Github, please consider reading this tutorial first: https://guides.github.com/activities/hello-world/
I. Clone the repository
If you are not one of the official maintainers of this project, you should first fork this repository: https://github.com/ADE-Scheduler/ADE-Scheduler/fork
Then, clone the forked repository somewhere on your machine. We will always refer to
the location of the project directory as <repo>.
II. Install NodeJS and NPM
First, you need NodeJS and NPM (Node Package Manager). It can be downloaded on the official site: https://nodejs.org/en/
Once it is installed, go to the <repo> directory and run:
$ npm install
This will install all the Javascript packages we use in the project.
Any javascript or HTML asset needs to be bundled by webpack before being used.
To do so, run in <repo>:
$ npx webpack
Moreover, you can activate the file watcher for hot-reloading and map source files for easy debugging by running:
$ npx webpack --watch --devtool inline-source-map
If an error appears about the maximum amount of allowed watchers, you can fix this by running:
$ echo fs.inotify.max_user_watches=524288 | sudo tee -a /etc/sysctl.conf \
&& sudo sysctl -p
III. Install Python
The project can work with a variety of Python versions, but we recommend Python 3.9.X as this is the version that is currently used in production. It can be downloaded from the official site: https://www.python.org/
Before installing Python packages: Some external packages require external dependencies, and missing them will cause errors during the installation process. Here are a few: - OpenSSL: https://www.poftut.com/install-use-openssl-library-python-applications/ - OpenLDAP: https://stackoverflow.com/questions/4768446/i-cant-install-python-ldap
IV. Create a virtual environment
Event though this step is not mandatory, it is good practice and highly recommended to create a Python virtual environment. This can be done in a few lines:
$ cd <repo>
$ sudo apt install python3-virtualenv
or equivalent command if you are not on ubuntu
$ virtualenv venv
$ source venv/bin/activate
$ pip install -r prod-requirement.txt # For production  (if you do not plan on modifying code)
$ pip install -r dev-requirements.txt # For development (else)
Warning
Whenever you want to run the project, you need to be in this virtual environment. You will then need to activate the environment each time you come back to work. Some IDEs such as PyCharm provide tools to automatically activate virtual environments.
V. Initialize the environment file
In this project, we use many configuration files. One of these files will carry sensible information such as password and it is your duty to create this file and to keep it secret.
Create a file named .flaskenv in the <repo> directory and fill the
following lines in:
<repo>/.flaskenv content for developmentFLASK_APP = path/to/<repo>/app.py
FLASK_ENV = development
FLASK_RUN_HOST = localhost
FLASK_RUN_PORT = 5000
TEMPLATES_AUTO_RELOAD = True
FLASK_SECRET_KEY = <super_secret_key>
FLASK_SALT = <super_complex_salt>
<repo>/.flaskenv content for productionFLASK_APP = path/to/<repo>/app.py
FLASK_ENV = production
FLASK_SECRET_KEY = <super_secret_key>
FLASK_SALT = <super_complex_salt>
Lines will be added to this file in other tutorials.
3. Database
Note
For permanent or long-term storage, a SQL database is used. While many implementations exist, we choose to use PostgreSQL for its robustness against high activity. SQLite has proven to be a bottleneck in performances for ADE Scheduler (in production) but can still be used for development.
I. Lite setup
Note
If it is your first time working on this project, we highly recommend you to follow this setup. The complete setup is only required for maintainers working with the database hosted on the ADE Scheduler server.
I-a. Install SQLite3
You will need to install SQLite3 to perform operation on your database. To do so, refer to instructions related to your machine. For ubuntu:
$ sudo apt-get install sqlite3
I-b. Create a database
You will need to create an empty database, wherever you want, on your machine.
Just create an empty file name ade-database.db.
Please, remember the location of the database, as you will need it for later in the tutorial. Now, you can directly jump to section III.
II. Complete setup
II-a. Install PostgreSQL
For this, we highly recommend you to follow this guide: https://www.postgresqltutorial.com/install-postgresql/
II-b. Setup a password
Even if it is not always required, it is good practice to setup a password for the
postgres user:
$ sudo -u postgres psql postgres
$ \password
enter your password_psql and confirm
$ \q
II-c. Create a database
In order to manipulate databases, you need to create a database instance:
$ sudo su - postgres
$ createdb ade-database
$ exit
II-d. Setup read without password access
By default, ADE Scheduler tries to access the database without password. Here, we need to explicitly allow the program to access the newly created database without password:
$ sudo {vim|geany|nano|...} /etc/postgresql/12/main/pg_hba.conf
and change `peer`/`md5` values to `trust`
$ sudo systemctl restart postgresql
III. Link database in .flaskenv
Now, you will need to tell the program where your database is located. To do so, add
this line in your <repo>/.flaskenv file:
$ ADE_DB_PATH="sqlite:///<path/to>/ade_database.db"
for SQLite3 (warning, <path/to> may be "/home/..." so it will add 1 more "/")
$ ADE_DB_PATH="postgresql://postgres@localhost/ade-database"
for PostgreSQL
or, alternatively, you can use an other database you have
$ ADE_DB_PATH=<database URI>
IV. Populate the database
If your database is empty, you need to populate it with the correct tables and columns. This can be done using the client:
$ flask sql init
4. ADE API
Note
The ADE API is the interface allowing ADE Scheduler to obtain all the information it needs, such as events, courses, etc., from the ADE server at UCLouvain.
I. With credentials
If you are one of the maintainers, you should have received credentials in order to proceed requests to the ADE API. If you do not have such credentials, please read next section.
In the <repo>/.flaskenv file, make sure to write those lines and complete with
your
credentials:
ADE_URL = <url to get token>
ADE_DATA = <grant_type>
ADE_AUTHORIZATION = <authorization access>
II. Without credentials
Because we cannot share the credentials with everyone, but we want people to be able
to have the best environment to contribute to ADE Scheduler, we created a fake API.
To use this fake API, you will need to modify the <repo>/.flaskenv
ADE_URL = <leave empty>
ADE_DATA = <leave empty>
ADE_AUTHORIZATION = <leave empty>

ADE_FAKE_API = true
Next, you need to download a compressed folder containing the fake api as a folder containing pickled requests and a README file explaining everything that you can request with this API. The fake_api folder should be placed in the <repo> folder. Please contact us if something isn’t working as expected.
Note
We know it is not the best way to provide you an access to the ADE API but we are still working on this and propositions are more than welcome!
5. Email
Note
In order to quickly receive feedback if anything goes wrong, ADE Scheduler will send you an email everytime an error occurs. This can be, of course, disabled to avoid email spamming. This email address can also be used to send account confirmation emails.
I. With credentials
Here, you will allow ADE Scheduler to send emails using your email address. You may need to allow third-party applications to let ADE Schedule use your email address. Please refer to your email provider documentation if so. If you do not want to use the emails, please read next section.
In the <repo>/.flaskenv file, make sure to write those lines and complete with
your
credentials:
MAIL_USERNAME = <email address>
MAIL_PASSWORD = <password>
II. Without credentials
In the <repo>/.flaskenv file, make sure to write those lines:
MAIL_USERNAME = <leave empty>
MAIL_PASSWORD = <leave empty>
MAIL_DISABLE = true
6. Launch
Almost there ! Once you proceeded to the above installation steps, you can now run the following command in your terminal to run the project. Make sure that you are still within the virtual environment.
$ flask run
Note
It is recommended to copy the above command lines (i.e., virtual environment activation, database initialization, redis-server startup, flask launch) in an executable script in order to facilitate the project launch for the next times. You can check the ‘docker/entrypoint.sh’ file for some inspiration.
Your terminal should now display a page url that you can access with your browser. This is your local version of the app!
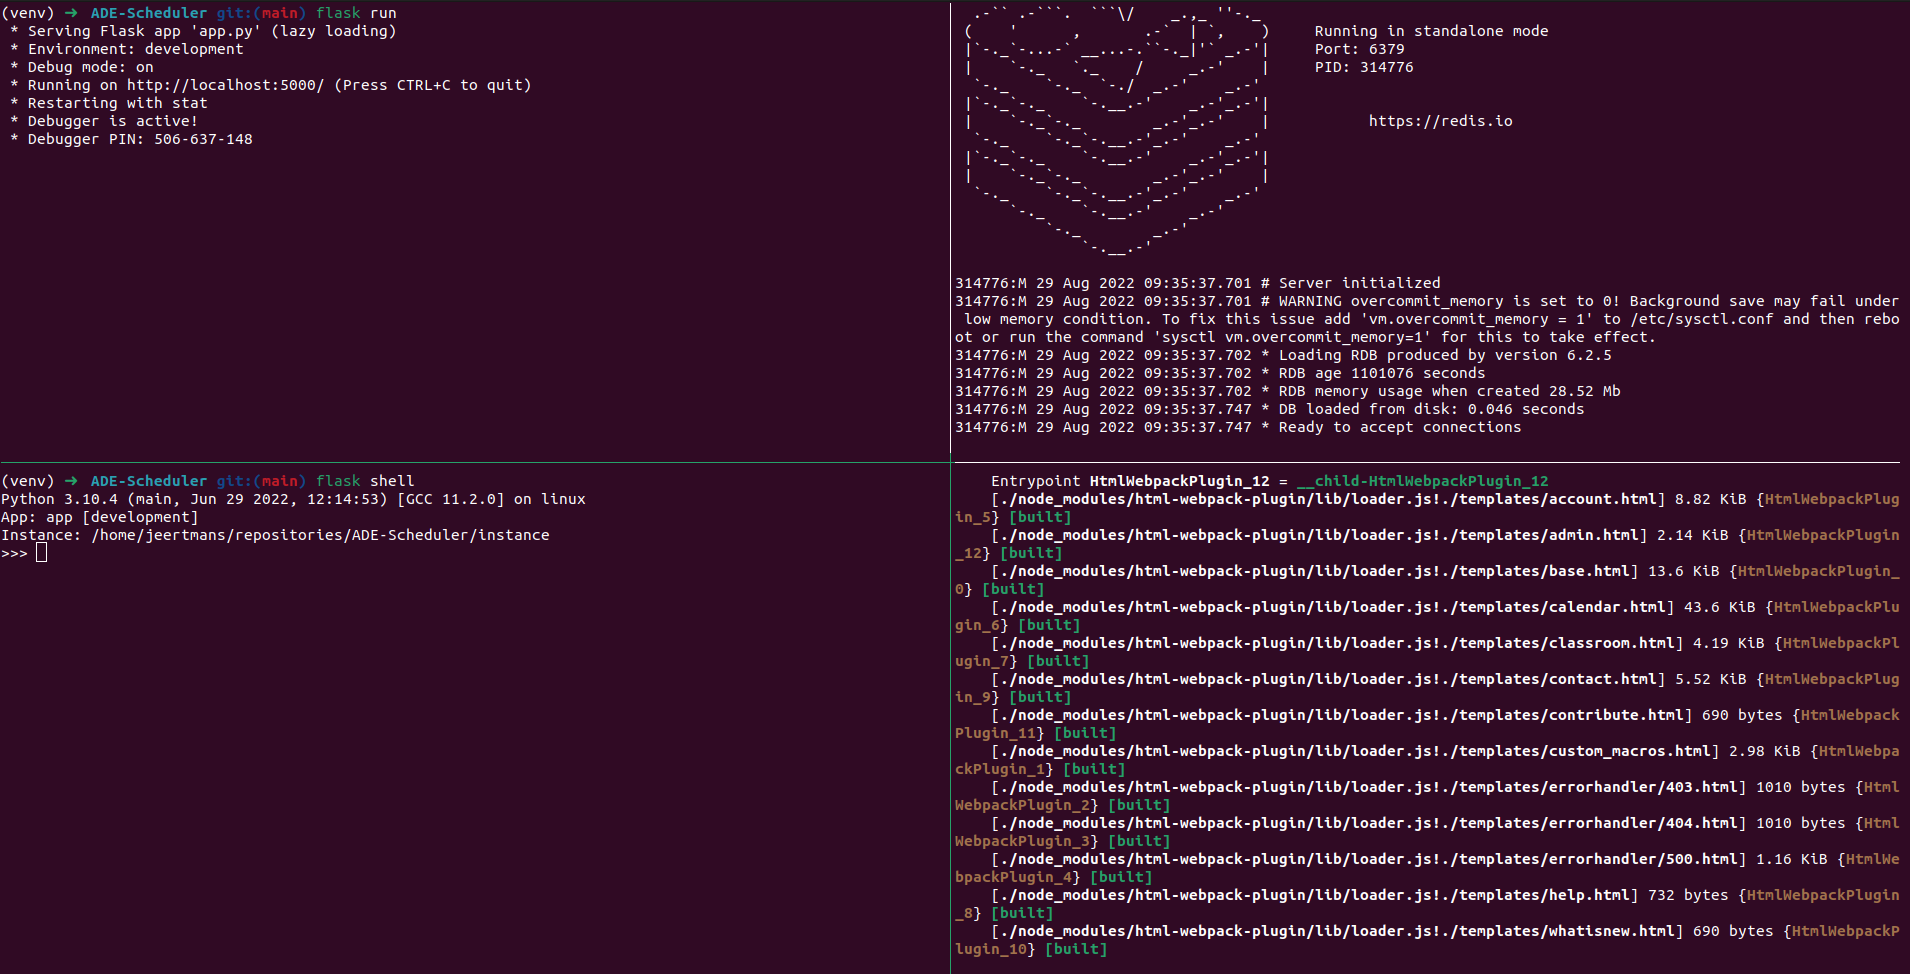
Example of terminal configuration when everything is running properly. Here, you can see four terminal sessions: flask server (upper left), redis server (upper right), flask shell (lower left), and webpack (lower right). The “(venv)” indicates that the virtual environment is activated (required for left terminals only).
7. Contributing
Note
In order to keep the code as readable as possible, some guidelines are followed. Even though our coding style can never be perfect, it is good practice to follow a common syntax for all the project, as it will help newcomers getting easily into the project, as well debugging.
I. Install pre-commit
Please follow the tutorial on the official site: https://pre-commit.com/
Once it’s done:
$ cd <repo>
$ pre-commit install
II. Create a branch
If you plan to contribute, it is always better to work on a separate branch with a
meaningful name. To do so, in <repo>:
$ git branch -b your-branch-name